| View previous topic :: View next topic |
| Author |
Message |
B 67
Joined: 23 Sep 2008
Posts: 277
Location: Stratford, Australia
|
 Posted: Sun Nov 16, 2008 12:39 pm Post subject: Road crossing Posted: Sun Nov 16, 2008 12:39 pm Post subject: Road crossing |
 |
|
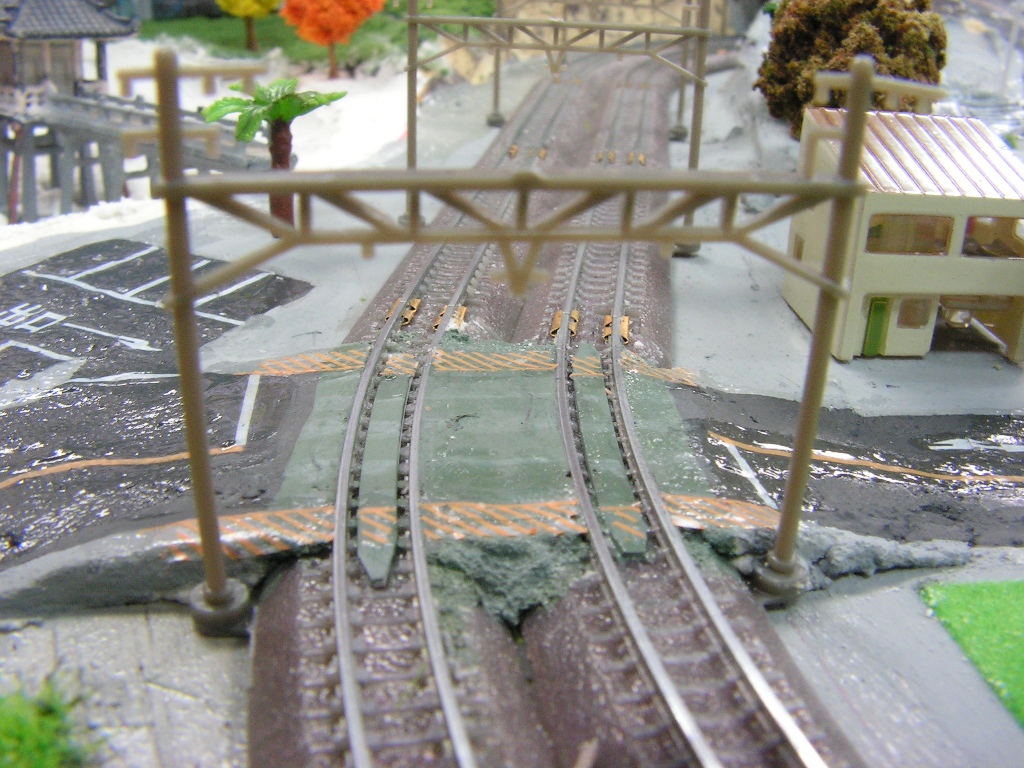
Made the railway crossing on my layout today. Photos to follow.
I have a road over rail bridge and a road under rail bridge on my tiny layout. I needed to have a level crossing as well, as I've long had a bit of a fascination with these in real and model form. See my road and rail signs and signals site.
I used Polyfilla to make the road up to the edges of the rails and between the two tracks. But I decided this was not going to be the best thing to use for the section of road between the rails.
I first tried cutting a piece of styrene to do the job, but after much filing and bending (the crossing is on a curve) the trains wouldn't cross without hitting the styrene. I then tried a section of styrene strip, about 2mm wide (I haven't measured it). After checking that it did fit comfortably between the flanges, I cut and filed the ends to act as a check rail (just in case) and glued them in place. Success! 
I painted the road and tomorrow I shall do the linemarking. To clean the track, I've been using a standard Peco rail cleaner - wide enough to clean the double track and it slides under the catenary masts too. However, I may cut it into smaller blocks. It removed the dried paint from the rails easily enough. Haven't found it leaves visible rubber particles, but I gently blow the track afterward, just to make sure. A new batch of these rail cleaners I recently received appear more 'crumbly' than the previous ones I've used. Something to be wary of.
Now I have to make some crossing signs and gates. I expect Eishindo will release some eventually. They appear in some photos on their website.
_________________
Darren,
Stratford,
Australia. |
|
| Back to top |
|
 |
B 67
Joined: 23 Sep 2008
Posts: 277
Location: Stratford, Australia
|
| Posted: Mon Nov 17, 2008 1:07 pm Post subject: |
|
|
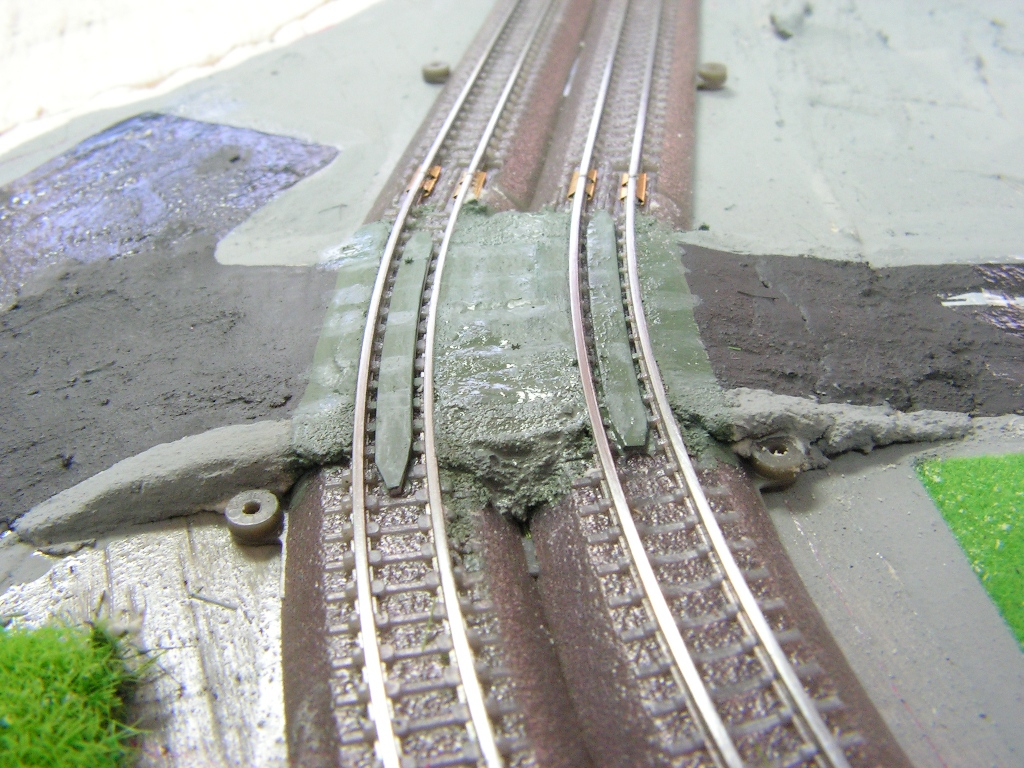
As you may have worked out already, above are a couple of photos of my level crossing. After studying crossings in Japan on Google Earth, I painted the road grey to represent the concrete slabs between the rails that seem to be normal there.
Linemarking to be done tomorrow - the paint should be dry by then. I've done some rudimentary weathering to simulate the passage of rubber over the concrete.
_________________
Darren,
Stratford,
Australia. |
|
| Back to top |
|
|
David K Smith
Chief Cook and Bottle Washer

Joined: 03 Sep 2008
Posts: 435
Location: New Jersey, USA
|
|
| Back to top |
|
|
B 67
Joined: 23 Sep 2008
Posts: 277
Location: Stratford, Australia
|
| Posted: Mon Nov 17, 2008 1:49 pm Post subject: |
|
|
Okay, as I typed that bit about Polyfilla, I had in my mind that I should explain in case it isn't available outside Australia. So why didn't I do it? [shrugs]
There are a range of products under this name, but the one I used was a pre-mixed filler intended for gaps and cracks in walls to prepare them for painting. It has the advantage of being easy to use, creates little mess, and does not shrink when dry. No doubt similar products are available in hardware and paint stores around the world.
http://www.polyfilla.com.au/
_________________
Darren,
Stratford,
Australia. |
|
| Back to top |
|
|
AndyA
Joined: 21 Oct 2008
Posts: 33
Location: Southampton, UK
|
| Posted: Tue Nov 18, 2008 9:03 am Post subject: |
|
|
"Polyfilla" products are marketed under that trade name here in the UK, although there are other equivalent products as well.
One specialist product folks might want to track down, is "lightweight filler" intended for joints in plasterboard. It's easy to identify - if you pick up the tub it feels as if it's empty.  I find that it's easier to get a fine finish than with the 'standard' filler, so I guess the stuff is intended for ham-fisted bodgers like me. I find that it's easier to get a fine finish than with the 'standard' filler, so I guess the stuff is intended for ham-fisted bodgers like me.
regards
Andy A |
|
| Back to top |
|
|
TBA
Joined: 08 Sep 2008
Posts: 120
Location: Massachusetts
|
| Posted: Tue Nov 18, 2008 11:41 am Post subject: |
|
|
Sounds like a two-part polyester filler. Here in the US I'd suggest looking at your local auto-parts store. Evercoat is one brand I've heard of. I guess Bondo is similar? I have also heard of a tube of filler putty also available there. Be aware as you mix the 2-part polyester putty that it will stink quite a bit. Proper ventilation is a must here. I have not used the tube-type.
Other than that, good old wood filler putty might work in a pinch if you don't need to trowel it on thickly.
In general I'd also recommend using a sub-roadbed for the roads to keep the surface closer to grade so you won't have to build up a high hump to cross the track. |
|
| Back to top |
|
|
B 67
Joined: 23 Sep 2008
Posts: 277
Location: Stratford, Australia
|
| Posted: Tue Nov 18, 2008 12:29 pm Post subject: |
|
|
I don't think Pollyfilla isn't anything like a 2-part polyester filler. For a start, it required no mixing, has almost no smell. It's more like a gritty plaster really. It can be sanded, scraped away easily with a blade or screw driver. It doesn't stick to the rails either (important, that bit).
Regarding levels, it might be easier to lower the track than build up the roads - and therefore everything around them.  It works if building roads around rice paddies since they would actually be elevated. I elected to just build the road up to the railway. After all, that commonly happens on the prototype. It works if building roads around rice paddies since they would actually be elevated. I elected to just build the road up to the railway. After all, that commonly happens on the prototype.
By the way, I used wood filler to make my hills. But had none left to make this crossing. Hardly worth buying more for such a tiny road crossing.
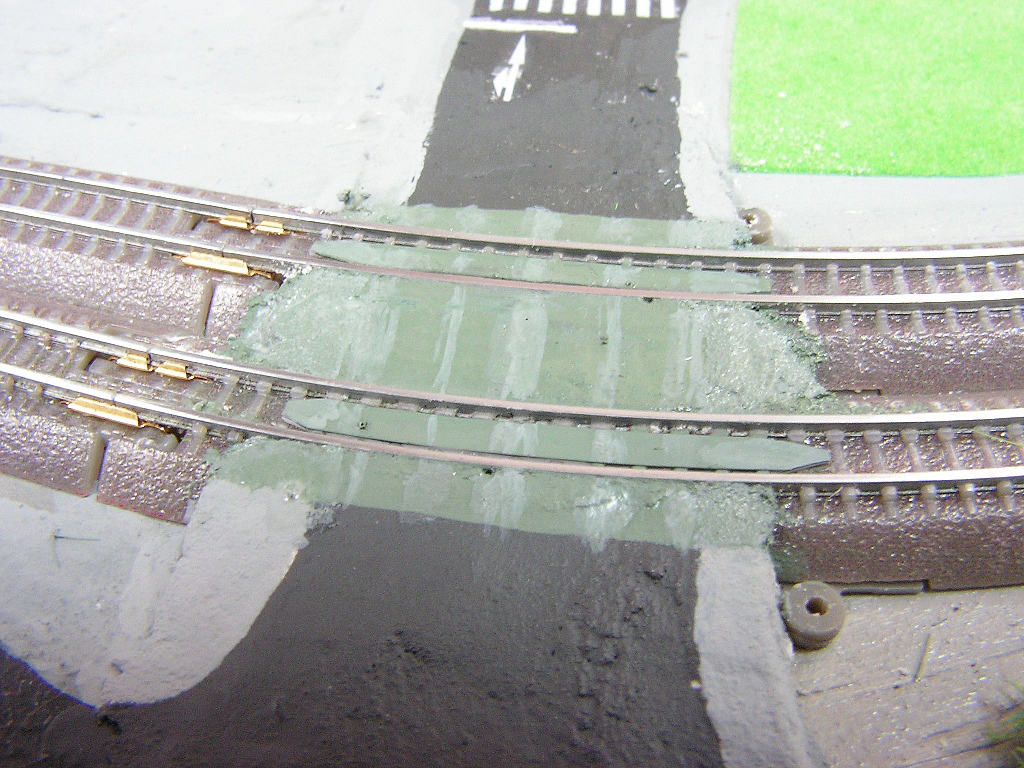
Did some more on the crossing today.
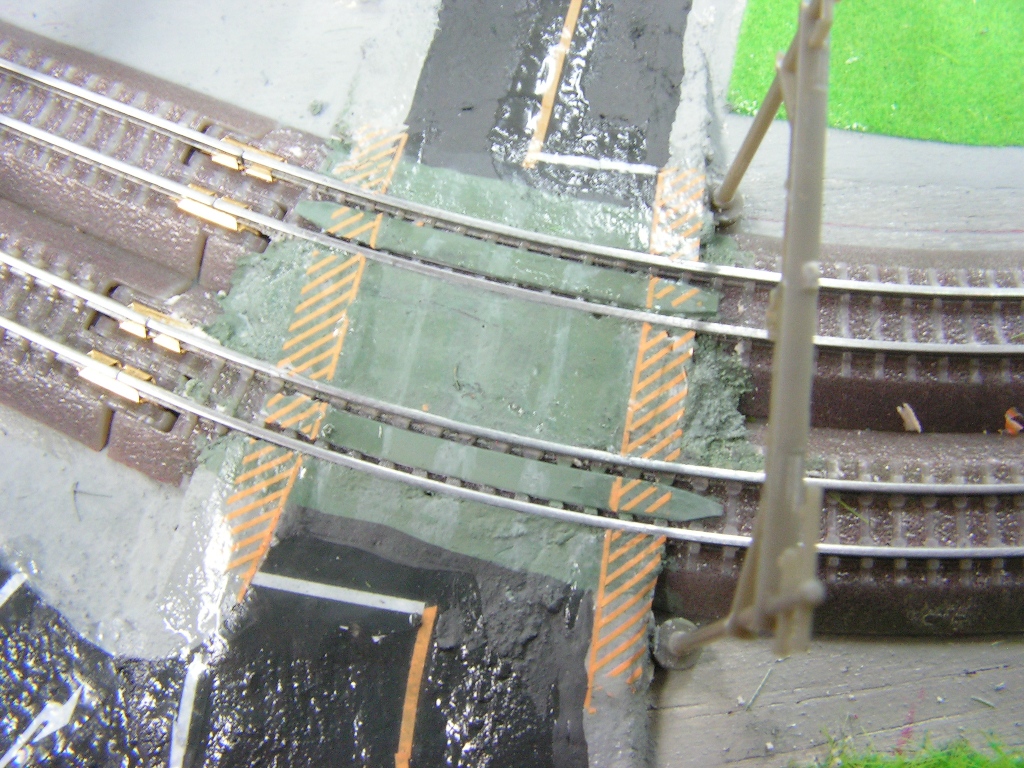
Added the yellow edge lines and diagonal stripes.
Still some glossy surfaces left on the road. Tried to go over these with clear matt today, but it didn't work. Might need more mixing.
_________________
Darren,
Stratford,
Australia. |
|
| Back to top |
|
|
David K Smith
Chief Cook and Bottle Washer
Joined: 03 Sep 2008
Posts: 435
Location: New Jersey, USA
|
| Posted: Tue Nov 18, 2008 1:21 pm Post subject: |
|
|
It definitely sounds like a lightweight spackling compound. There are products like this in the states. I believe it's regular compound (a plaster-like product) with a fine, lightweight aggregate added.
_________________
David
http://www.t-gauge.net/
http://1-450.blogspot.com/ |
|
| Back to top |
|
|
B 67
Joined: 23 Sep 2008
Posts: 277
Location: Stratford, Australia
|
| Posted: Tue Nov 18, 2008 1:57 pm Post subject: |
|
|
Spackling compound is probably correct. The following paragraph is from the Polyfilla website.
"The Poly brand was first introduced on to the Australian market in the late 1960s by Reed International, under licence from Polycell UK. Poly was considered revolutionary because the Polyfilla Cellulose Filler didn't crack or shrink, unlike the spackle based fillers which were available at the same time. "
The one I used isn't the finest grade they make, so not the most ideal for using on the roads. Oh well, this is only my first T gauge layout. Presumably the next one will be better - I'll have learnt from the 'mistakes' made this time.
_________________
Darren,
Stratford,
Australia. |
|
| Back to top |
|
|
TBA
Joined: 08 Sep 2008
Posts: 120
Location: Massachusetts
|
| Posted: Tue Nov 18, 2008 10:46 pm Post subject: |
|
|
OK...the POLY part threw me.
Another idea might be to try Squadron filler putty available at hobby shops in the US. It comes in green and also white. I don't think there's a difference between the two. It also stinks a bit. Testor's filler putty might work as well. |
|
| Back to top |
|
|
B 67
Joined: 23 Sep 2008
Posts: 277
Location: Stratford, Australia
|
| Posted: Tue Nov 18, 2008 11:00 pm Post subject: |
|
|
I guess there are many fillers one could use. As I'm building the layout in the shop, I try to use products that don't make customers have to leave, gasping for fresh air.
The Polyfilla has no such problem being virtually odourless.
_________________
Darren,
Stratford,
Australia. |
|
| Back to top |
|
|
David K Smith
Chief Cook and Bottle Washer
Joined: 03 Sep 2008
Posts: 435
Location: New Jersey, USA
|
| Posted: Tue Nov 18, 2008 11:49 pm Post subject: |
|
|
| TBA wrote: | | Another idea might be to try Squadron filler putty available at hobby shops in the US. It comes in green and also white. I don't think there's a difference between the two. It also stinks a bit. |
Squadron not only stinks--more than just a bit--but it also shrinks. Plus it's a mighty expensive material to use in the quantities needed for roads.
I think the lightweight spackling compounds are probably ideal. They're cheap, they don't shrink much, and they don't stink at all.
_________________
David
http://www.t-gauge.net/
http://1-450.blogspot.com/ |
|
| Back to top |
|
|
Chris333
Joined: 25 Sep 2008
Posts: 74
|
| Posted: Wed Nov 19, 2008 1:00 am Post subject: |
|
|
| The model car people hate Squadron because it never fully hardens, they like to only use 2 part putties. |
|
| Back to top |
|
|
TBA
Joined: 08 Sep 2008
Posts: 120
Location: Massachusetts
|
| Posted: Wed Nov 19, 2008 10:30 am Post subject: |
|
|
Sorry I was thinking only of the grade crossings themselves and not the entire road surface. For crossings I didn't think you'd need that much. I was just throwing some ideas out.
Yes, the Squadron putty is not the greatest. In fact I was thinking it might only be good for paving grade crossings. 
I mainly do model cars and trucks now, and use Tamiya putty which is harder to get and more expensive, but is much better quality than the Sqadron putties. |
|
| Back to top |
|
|
TBA
Joined: 08 Sep 2008
Posts: 120
Location: Massachusetts
|
| Posted: Wed Nov 19, 2008 12:21 pm Post subject: |
|
|
Speaking of roads, I was reminded of a sample of a model railroad roadway material I got at train show several years back.
Basically it's a water-based vinyl compound paste you spread out in a thin layer until it hardens. I have just a sample roadway made from the stuff...I never bought the product to try. I found the product is apparently still available.
Manufacturer's page: http://www.bibaland.com/real-road/index.html |
|
| Back to top |
|
|
|